I was finally able to migrate from WordPress to a gorgeous, static, and blazing fast blog, hosted on GitHub Pages for free. Here is a recap of what I did, starting with exporting all data from WordPress, and finishing with setting up an automatic publishing with AppVeyor!
Let’s begin!
There are many options for generating static websites available: Jekyll, Octopress, Wyam, Sandra.Snow, to name a few (see the complete list here), however I decided on a Node.js based generator called Hexo.io, based on a few recommendations.
Prerequisites
For the migration process, you will need the following:
- Existing (hosted) WordPress blog - admin access required to install several plugins (WordPress.com blogs are not supported)
- Hexo installed and ready
- GitHub and AppVeyor accounts
- Favorite Markdown/text editor (I prefer Visual Studio Code)
Step 1: Export WordPress data as Jekyll
Jekyll, being one of the older static generators, is widely supported, including this wonderful plugin for WordPress called WordPress to Jekyll Exporter.
Go to your WordPress admin panel and install the WordPress to Jekyll Exporter plugin. After installing and activating the plugin, you should have a new menu under Tools called Export to Jekyll. Depending on the size of your blog, this might take a few minutes to complete, but a new zip file called jekyll-export.zip should begin downloading.
Exported data from WordPress will contain all the posts and other static pages in Markdown (.md) files. The blog posts themselves are contained in a _posts directory inside the jekyll-export.zip archive.
Since our ultimate goal is to eventually delete the WordPress blog, it’s best to make a complete backup of all the content. You can do this via your hosting’s FTP or with another great WordPress plugin called Duplicator, which can export everything for you into a zip file. We will also need the contents of this zip to replace any broken images and other files.
Step 2: Configuring Hexo
Create a new Hexo site using e.g. hexo init blog, it will create a directory called blog, containing configuration files and a default theme. Perform any additional configuration as specified in the docs.
Next, we need to import our exported WordPress data. Follow the migration instructions on Hexo docs. This will make Hexo use the default Jekyll post format (yyyy-MM-dd-title.md), so no renaming is needed. I actually prefer it like this.
Start the hexo server by running hexo server --debug (to output any parsing errors which may occur). This should launch the blog at address http://localhost:4000.
The default post metadata inside each exported .md file will contain lots of tags that are not needed, like id, permalink, metadata for Akismet and Disqus (if relevant). This, in turn, might interfere with how Hexo creates post links. Remove all the extra metadata that is not required.
In my particular case, I had removed ALL additional entries from the post headers, except title and date, e.g.:
--- |
After removing and saving the .md file, it will be automatically recompiled by Hexo (if the server is running). Refresh the browser window to see the changes
Step 3: Manual labor
Here is the nasty part - fixing up any syntax errors and broken images. Unfortunately, in some cases the export does not do a very good job, so manual tweaks are needed. If you used Windows Live Writer to write posts (as I had), you’ll find it likes replacing - with –, and worse. This part is, unfortunately, the most difficult in this entire process.
Once you’re done fixing most issues, verifying each time it renders correctly in the browser, time to set up GitHub!
Tip: make sure to utilize Hexo’s Tag plugins as much as possible, they really help when dealing with things like relative image locations.
Step 4: Deploying to GitHub
There are two ways to set up GitHub pages: per user/organization or per project. We will use the latter option, keeping both the source (.md files) and the generated static pages (.html) in the same repo (using the special gh-pages branch for the static files).
We’ll start by creating a repository for our blog. I called mine after the domain name, hmemcpy.com. Copy the HTTPS (not SSH) URL of the repository to the clipboard (HTTPS is required for deploying from AppVeyor, see below).
Next, we need to prepare the blog for automated git deployment, by using a plugin called hexo-deployer-git. Install the plugin per instructions. Add the following to the _config.yml file (under Deployment):
# Deployment |
Next, we need to make the blog directory into a git repo. We can do this by typing the following:
git init |
Once everything is set, type hexo deploy to generate and deploy the site to GitHub! Once it’s done, verify it works by navigating to username.github.io/reponame. This proves that Hexo is set up to deploy automatically to the correct branch (gh-pages). Lastly, we will automate this!
Step 5: Auto-deploy to GitHub from AppVeyor
AppVeyor is a great Continuous Delivery service, which can perform lots of tasks, including launching our own custom commands. Our goal is to perform hexo deploy for us, each time a change is made on the source (master branch).
There are several things we need to do.
First, in order to deploy to our repo from AppVeyor, we need to create a Personal access token on GitHub. Go to https://github.com/settings/tokens, and click Generate new token. After entering your password for security purposes, create a new token with the repo permissions:
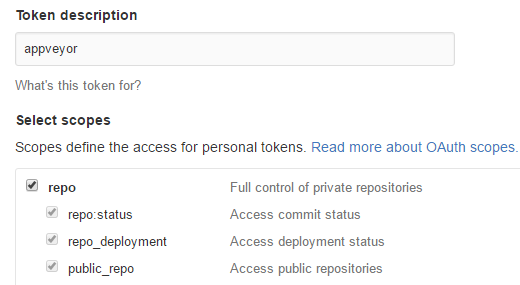
After clicking Generate token, you’ll have the token appear. Copy it to the clipboard now!
Next, to use the token securely from AppVeyor we need to encrypt it.
Go to https://ci.appveyor.com/tools/encrypt, and paste the token value into the Value to encrypt input field, and press the Encrypt button. Copy the Encrypted value to the clipboard.
Next, add a file called appveyor.yml to the root of your blog directory (next to _config.yml), containing the following:
branches: |
Finally, we need to create a CNAME file, if we want to use a custom domain with our repo. Luckily, Hexo supports deploying arbitrary files! Create a new file called CNAME (no extension), put the domain name without http or https prefix, and put it under the source directory of your blog, next to _posts. If you want a custom favicon or robots.txt, place them there as well.
Save and push the files to GitHub. We’re now should be all set for automated deployment!
In AppVeyor, click New Project and select your blog repo. With appveyor.yml in the repo root, there’s no need for any additional configuration! Press New Build and wait. If everything was successful, your new blog should be auto deployed to GitHub!
Happy blogging!